
Table of Contents
Residential window tinting is gaining popularity among homeowners due to its numerous benefits. In addition to enhancing the aesthetic appeal of a home, it provides privacy, reduces glare, and minimizes the heat and harmful UV rays that enter living spaces. If you’re considering installing window tinting in your home, it’s crucial to understand the installation process to ensure a successful and professional outcome. In this article, we will guide you through the step-by-step process of residential window tinting installation.
1 Step 1: Preparing for the Installation
Before the installation process begins, there are a few essential preparations to be made. These steps will help ensure a smooth and efficient installation:
- Measurements and Assessments: To ensure accurate and precise installation, professional window tinting experts will visit your home to take measurements of the windows that require tinting. They will assess the condition of the windows to determine if any repairs or cleaning are necessary before installation. This step is crucial as it allows the experts to provide you with an accurate quote and ensure that the window tinting fits perfectly.
- Choosing the Right Tint Film: There are various types of window tint films available in the market, each with distinct features and benefits. During this stage, you will work closely with the experts to select the ideal tint film that suits your specific requirements and preferences. Factors to consider include the level of privacy you desire, the amount of heat reduction needed, and the desired appearance of the tint. The experts will provide you with detailed information about each type of film, helping you make an informed decision.
- Scheduling and Logistics: Once the measurements and film selection are finalized, an installation date will be scheduled according to your convenience. The installation team will ensure that all necessary tools and equipment are ready for the task. They will also discuss any specific requirements or considerations, such as access to the windows or the need to move furniture, to ensure a smooth installation process.
2 Step 2: Window Preparation
On the day of installation, the professional team will begin by thoroughly preparing the windows to achieve optimal results:
- Cleaning the Windows: The windows are cleaned using a specialized cleaning solution, ensuring that any dirt, grime, or residue is removed. This step is crucial as it allows the tint film to adhere properly to the glass surface. The professionals will use non-abrasive cleaning tools and techniques to avoid scratching or damaging the windows during the cleaning process.
- Removing Existing Films or Adhesives: If there are any existing tint films or adhesive residues on the windows, they will be carefully removed. This step ensures a clean and smooth surface for the new tint film to be applied. The professionals will use safe and effective techniques to remove the existing films or adhesives without causing any damage to the glass. This process may involve the use of specialized solutions or tools to dissolve and remove the old film or adhesive.
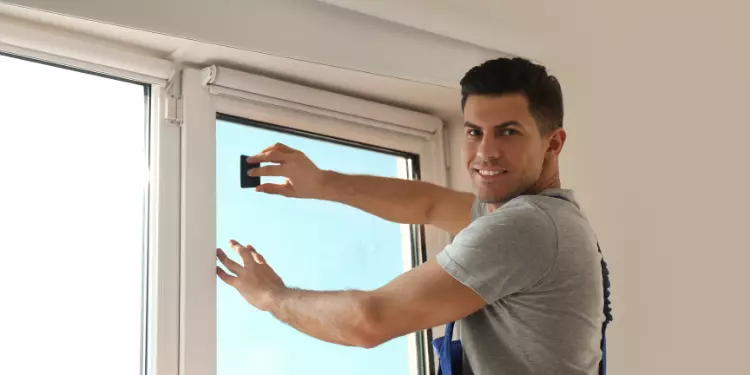
3 Step 3: Applying the Window Tint Film
Once the windows are properly prepared, the installation of the window tint film can begin:
- Cutting the Film: The tint film is cut according to the precise measurements taken earlier. Experts use precise cutting tools to create accurate sizes that perfectly fit each window. They will take into account any patterns or shapes on the glass, ensuring a precise and seamless installation. This step requires skill and precision to ensure that the film fits perfectly without any gaps or overlaps.
- Activating the Adhesive: The tint film has an adhesive layer that activates when exposed to moisture. The professionals will spray a solution onto the glass surface, carefully ensuring it is evenly distributed. This solution activates the adhesive and allows the film to adhere to the glass. The experts will ensure that the solution is applied evenly and in the right amount to ensure proper adhesion without causing any damage to the film or the glass.
- Applying the Tint Film: The tint film is then applied to the glass surface, starting from the top and working their way down. Experts use squeegees and special tools to remove any air bubbles or wrinkles, ensuring a smooth and flawless finish. They will carefully position the film, ensuring that it aligns perfectly with the edges of the window. The squeegee is used to remove any trapped air or moisture, ensuring a tight and secure bond between the film and the glass. This step requires skill and precision to achieve a professional and seamless installation.
- Trimming the Excess Film: After the film is applied, the excess material is trimmed, leaving a clean edge along the edges of the window glass. The professionals will use precision cutting tools to trim the film, ensuring a clean and neat appearance. This step not only enhances the overall aesthetics but also prevents any peeling or lifting of the film over time.
- Drying and Curing: The tint film requires time to dry and cure properly. This process may take a few days, and during this time, it is essential to avoid touching or cleaning the film to prevent any damage. The professionals will provide you with specific instructions on how to care for the film during the drying and curing process. They may advise you to avoid opening or closing the windows for a certain period and to avoid using harsh cleaning agents on the film.
4 Step 4: Post-Installation Inspection
Once the installation is complete, a post-installation inspection is conducted:
- Quality Check: The professionals will check the entire installation for any imperfections, such as air bubbles, creases, or debris. If any issues are found, they will be promptly addressed to ensure a flawless result. This step ensures that the installation meets the highest standards of quality and that you are completely satisfied with the outcome.
- Cleaning and Final Touches: The windows are cleaned again to remove any remaining residue or marks. The professionals will ensure that the windows are left in a pristine condition. They will use specialized cleaning solutions and techniques to ensure that the windows are sparkling clean and free from any streaks or smudges.
- Final Assessment and Tips: The installation team will provide you with guidelines and tips on how to care for your newly installed tinted windows. They will answer any questions you may have regarding maintenance or product warranties. They may provide you with information on how to clean the tinted windows, what products to use or avoid, and how to prolong the lifespan of the tint film. They will also inform you about any warranty coverage or maintenance services that may be available.
By following these steps, you can have confidence in the installation process and enjoy the benefits of residential window tinting in your home.
5 FAQ
1. What is the first step in the residential window tinting installation process?
The first step is measurements and assessments, where professionals measure the windows and assess their condition for accurate installation.
2. How do I choose the right tint film for my windows?
You will work closely with the experts to select the ideal tint film based on factors such as privacy level, heat reduction, and desired appearance.
3. What is the process for applying the window tint film?
The process involves cutting the film to precise measurements, activating the adhesive with a solution, applying the film to the glass surface, removing air bubbles, trimming the excess film, and allowing it to dry and cure.
4. What happens during the post-installation inspection?
A quality check is conducted to ensure a flawless result, followed by cleaning the windows and providing guidelines and tips for maintenance and warranties.


