
Table of Contents
Window tinting is a popular way to enhance the overall look and functionality of your vehicle, home, or office windows. Not only does it provide a sleek and stylish appearance, but it also offers privacy, reduces glare, protects against harmful UV rays, and helps to regulate the temperature inside. While professional window tinting services are available, many individuals prefer to take on the task themselves to save money and have the satisfaction of a job well done. In this article, we will provide you with a step-by-step guide on how to install window tinting like a pro, ensuring a flawless finish.
1 Materials and Tools Needed
Before diving into the installation process, it is essential to gather all the necessary materials and tools. This will ensure a smooth and hassle-free window tinting experience. Here is a list of items you will need:
- Window tint film: Choose a high-quality window tint film that suits your needs and preferences. There are various types available, such as dyed film, metalized film, and ceramic film, each offering different levels of heat rejection and UV protection.


- Window cleaner: Use a non-ammonia-based window cleaner to thoroughly clean the windows before applying the tint film. This will ensure that the surface is free from any dirt, dust, or grime.

- Squeegee: A squeegee is a necessary tool for removing air bubbles and excess water during the installation process. Opt for a squeegee with a rubber edge to prevent scratching the tint film.

- Spray bottle: Fill a spray bottle with water to use as a lubricant when positioning the tint film onto the window surface. The water will allow you to slide and adjust the film as needed.

- Utility knife or window tinting cutting tool: A sharp utility knife or a dedicated window tinting cutting tool will be used to trim the tint film to the correct size and shape.

- Heat gun: A heat gun or hairdryer on a low setting can be used to gently heat the tint film and aid in removing air bubbles or creases.

- Microfiber cloth or lint-free towel: Use a microfiber cloth or lint-free towel to wipe away excess moisture and water droplets during the installation process. These materials are soft and won’t scratch the tint film.

- Masking tape: Masking tape can be used to hold the tint film in place while you work on positioning it onto the window surface. It will prevent the film from shifting or moving during the installation process.

- Measuring tape: Use a measuring tape to accurately measure the dimensions of the window you wish to tint. It is important to measure carefully to ensure the tint film covers the entire surface.

- Plastic scraper or credit card: A plastic scraper or credit card wrapped in a microfiber cloth can be used to remove any stubborn air bubbles or excess water from the center towards the edges of the window.


Disclaimer: As an Amazon Associate I earn from qualifying purchases.
2 Step 1: Preparing the Window Surface
To achieve a professional window tinting finish, it is crucial to start with a clean and smooth surface. Begin by thoroughly cleaning the windows using a non-ammonia-based window cleaner and a lint-free cloth. Remove any dirt, dust, or grime, ensuring that the windows are spotless. This step is essential as any remaining debris can cause bubbles or imperfections after the tint film is applied.
Once the windows are clean, inspect them for any scratches or damage. If there are any imperfections, it is recommended to address them before proceeding with the tinting process. Repairing any existing damage will ensure a smooth and flawless finish.
3 Step 2: Measuring and Cutting the Tint Film
Measure the dimensions of the window you wish to tint using a measuring tape. Add an extra inch to each side of the measurement to allow for a proper fit and easy trimming. This additional inch will provide some margin for error and ensure that the tint film fully covers the window surface.
Mark the measurements on the tint film using a non-permanent marker or masking tape. Take your time to ensure accurate markings. Once the measurements are marked, carefully cut the tint film using a sharp utility knife or a dedicated window tinting cutting tool. It is important to make precise and accurate cuts to achieve a professional finish.
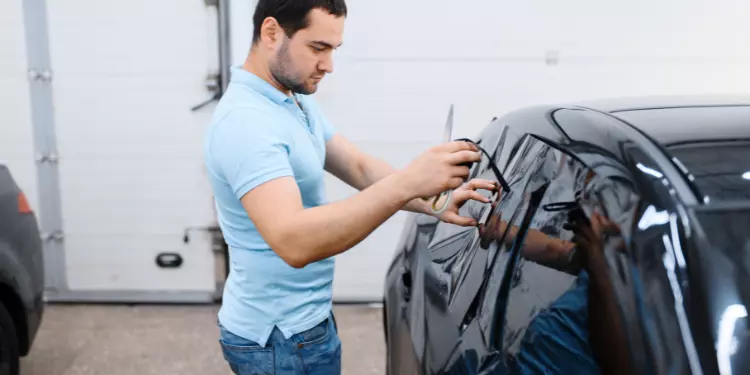
4 Step 3: Applying the Tint Film
Before applying the tint film, spray a fine mist of water onto the window surface using a spray bottle. This will act as a lubricant and help in positioning the tint film accurately. The water will allow you to slide and adjust the film as needed, ensuring a perfect fit.
Peel the protective backing off the tint film and generously spray the adhesive side with water. Carefully position the film onto the window, ensuring it covers the entire surface. Use your hands or a squeegee to press the film onto the window, starting from the center and working your way towards the edges. The water will help in removing any air bubbles or creases that may form during the application process.
5 Step 4: Removing Air Bubbles
Using a squeegee or a credit card wrapped with a microfiber cloth, gently push out any air bubbles or excess water from the center towards the edges. Start from the top of the window and gradually move downwards. Take your time and work methodically to avoid any creases or imperfections. It is important to apply even pressure to ensure the film adheres properly to the window surface.
If stubborn bubbles persist, use a heat gun or hairdryer on a low setting to gently heat the film and smooth it out. Be cautious not to overheat the film, as excessive heat can cause damage. Keep the heat source at a safe distance and continuously move it to prevent overheating.
6 Step 5: Trimming the Excess Film
Once the tint film is smooth and free of bubbles, use a sharp utility knife or a dedicated window tinting cutting tool to trim off the excess film around the edges of the window. Take care to make precise cuts and follow the window’s shape for a seamless appearance. It is recommended to use a straight edge or a ruler as a guide to ensure straight and accurate cuts.
7 Step 6: Drying and Final Touches
After trimming off the excess film, use a lint-free towel or microfiber cloth to gently wipe away any excess moisture or water droplets. Start from the top of the window and work your way downwards. Be gentle to avoid disturbing the tint film.
Allow the tint film to dry completely before rolling down the windows or touching the surface. The drying process may take a couple of days, depending on the climate and humidity levels. Avoid exposing the newly tinted windows to excessive moisture during this time.
8 Additional Tips for a Professional Finish
- Start with smaller windows or practice on spare pieces of tint film before tackling larger windows to gain confidence and perfect your technique. This will help you familiarize yourself with the installation process and improve your skills.
- Avoid installing window tinting in direct sunlight or extreme temperatures, as it can affect the film’s adherence and cause difficulties during the installation process. Choose a shaded area or work indoors if possible.
- Regularly clean the tinted windows using a non-abrasive cleaner and a soft cloth to maintain their appearance and longevity. Avoid using harsh chemicals or abrasive materials that can damage the tint film.
- Consider investing in high-quality window tint film that offers UV protection and reduces heat transmission for enhanced comfort. High-quality films are more durable and provide better performance in terms of heat rejection and UV protection.
By following these step-by-step instructions and considering the additional tips provided, you can confidently install window tinting like a professional. Remember to take your time, work meticulously, and ensure a clean and smooth surface for the best results. Window tinting not only enhances the aesthetic appeal but also provides several functional benefits, making it a worthwhile investment for any vehicle or property owner. So, get ready to enjoy the privacy, protection, and style that window tinting offers!
9 FAQ
- What materials and tools do I need for window tint installation?
- Window tint film
- Window cleaner
- Squeegee
- Spray bottle
- Utility knife or window tinting cutting tool
- Heat gun or hairdryer
- Microfiber cloth or lint-free towel
- Masking tape
- Measuring tape
- Plastic scraper or credit card
- How do I prepare the window surface before installation?
- Thoroughly clean the windows using a non-ammonia-based window cleaner and a lint-free cloth.
- Inspect for any scratches or damage and address them before proceeding.
- How do I measure and cut the tint film?
- Measure the dimensions of the window using a measuring tape, adding an extra inch to each side.
- Mark the measurements on the tint film and cut it carefully using a sharp utility knife or window tinting cutting tool.
- What is the process for applying the tint film?
- Spray a fine mist of water onto the window surface using a spray bottle.
- Peel the protective backing off the tint film and spray the adhesive side with water.
- Position the film onto the window, pressing it from the center towards the edges.
- Use a squeegee or credit card wrapped with a microfiber cloth to remove air bubbles and excess water.


